DIY Baby Quilt - No Basting!
I have had a major case of baby-crafting-fever lately! Today I'm sharing how I put together a baby quilt, and the best part is that there is no basting involved! It really is a pretty simple process, it just takes some time. I used leftover fabric along with a handful of fat quarters to make this quilt, I found a few really awesome fabric shops on Etsy that have a selection you won't find anywhere else, here are my current favorites:
After I washed and ironed my fabric I used this handy-dandy tool to cut my fabric into 6" squares, (and I am so sorry I didn't think to take pictures of this process!), then I laid out the squares into different designs and patterns until I was happy with it, the quilt ended up being 6 squares across and 9 long. Once I was happy with the layout I sewed each piece together, I started by going across the rows and then I sewed the rows together - I used a 1/4" seam allowance.
Now, the BEST part! NO basting! I have used fusible batting once before and I loved it, I found this on Amazon, the best part about fusible batting is that you only need to sandwich it between your top and bottom quilt layers, iron (with steam) over the entire quilt, and that's it! Then you can sew your edge and whichever quilting design you'd like without worrying about the batting shifting and becoming a headache. And don't worry, the instructions are right there on the batting wrapping, just be sure to follow them and everything will go wonderfully!
So, lay out your batting and smooth it out the best you can, cover with your top layer and trim the batting down to size.


Next, lay out your bottom layer - I used 1.5yds of fabric, top with the batting and the top of the quilt:

Now, trim your bottom layer as desired, I left 2" around the edge:

Now let's iron the batting! Be sure to follow the instructions on the packaging and always start in the middle and work your way out:


Once your quilt is pressed you can deal with the edging, you can do whichever corners you'd like, I kept this simple and just folded the corners like this:
 |
| Trim a bit off so you don't have overly-bulky corners that are difficult to sew through. |
 |
| I just folded one corner over the other. |
To fold the edges I just folded the edge once and then again, then pin in place:


While you still have your iron out go ahead and iron your edging, it will make sewing soooo much easier:

Now you can sew your edge! (Be sure to use thread that matches your fabric if you don't want an obvious seam). I sewed as close to the inside edge as I could and I reinforced the corners with a bit of a backstitch:


Now you can sew your quilting design, I used my handy-dandy Fiskars ruler and some chalk to help me get straight lines (fabric pencils would work great too), I decided on using diagonal lines in a criss-cross pattern:


Go ahead and sew your lines then repeat going in the opposite direction:


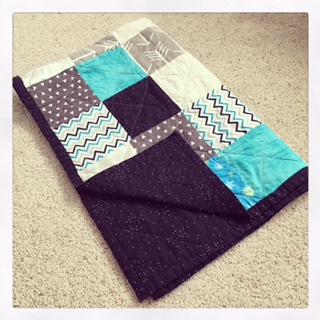
And there you have it! My quilt turned out to be 31.5" wide and 47" long, I probably would increase the size 1 square each way next time - 7 across and 10 long.
I did wash my quilt when I was finished to get rid of the chalk lines and I must say, I quite like how it turned out! This was my very first solo quilt adventure and although it did take some time - especially with my almost-third trimester belly, it was fairly easy overall and I just may make more in the future!


Comments
Post a Comment